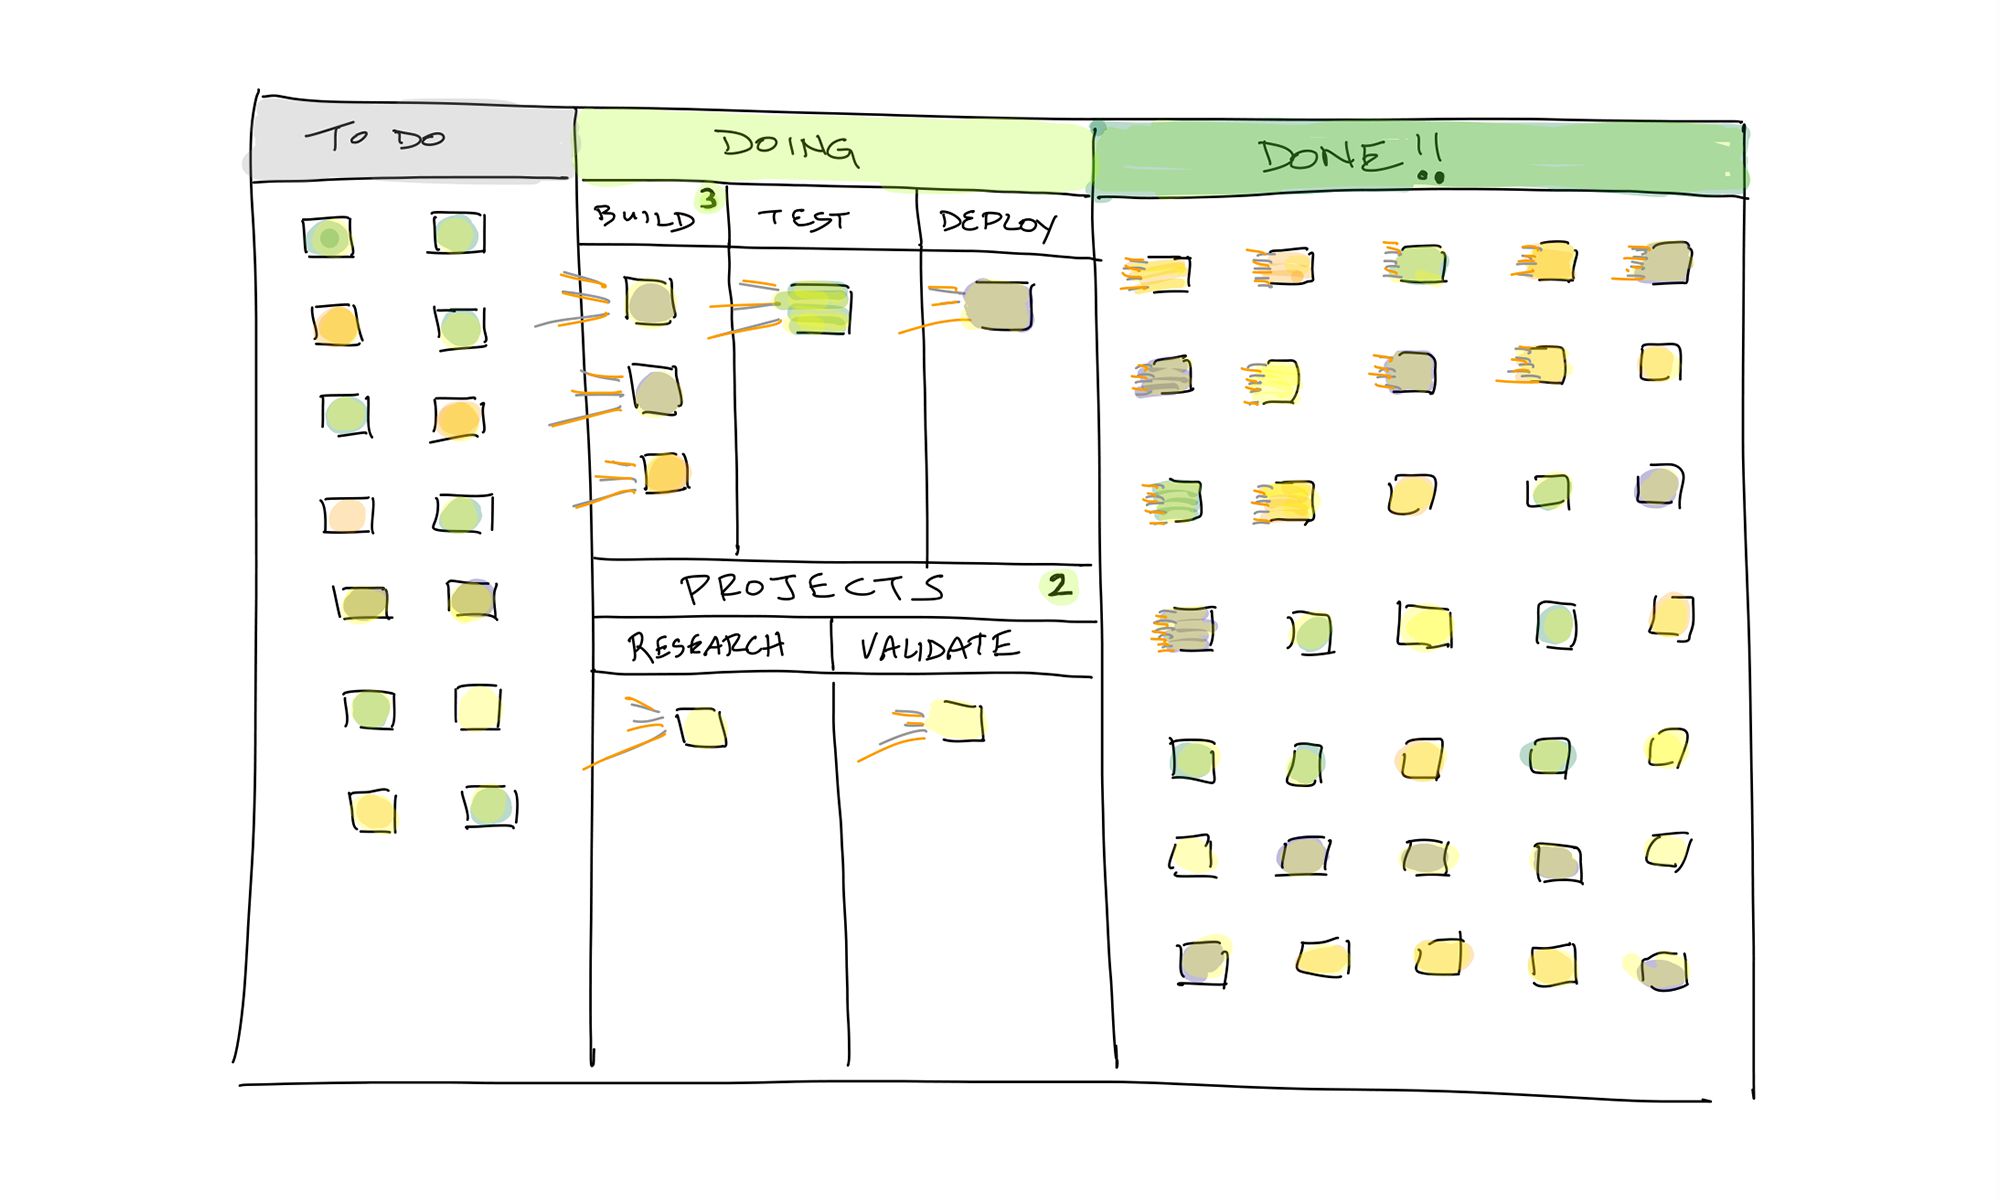
Visualizing what you do now is largely regarded as one of the initial steps in a Kanban or Lean journey. Even starting with simple To Do, Doing, and Done lanes on a Planview AgilePlace board works wonders. People know what work is “happening” and the current status. They understand the flow of work and sequence of actions to get things done.
This transparency — one major outcome of visualizing work — is only the starting point though.
What most teams are really aiming for is speed. So the question becomes: What steps does a team need to take to go from simple visualization to continuous, speedy value delivery?
Tips for Designing Your Planview AgilePlace Board for Speed
Understand Your “What” and “How”
Whether building a new Planview AgilePlace board or making changes to an existing one, take a look at the “how” and the “what.” It’s important to distinguish these upfront so that when it’s time to seek out areas for improvement, you’re able to look at the right inputs.
When configuring a Planview AgilePlace board, the how — or actions — represent the lanes or process steps in your flow., e.g. build, review, merge, deploy, release. Ensuring that no step goes unnoticed can be difficult, but acknowledging something like a handoff between people or teams can help inform areas for simplification down the road. If you find that there are different steps for different types of work, it’s time to use horizontal swimlanes to help distinguish the flows.
The what — or deliverables — represent the types of work that move through the steps to arrive at completion. These items can be large work items, e.g. a contract, feature, or campaign or smaller ones, e.g. changing a system error message or web page image. In order to understand patterns and learn from them, it’s important to differentiate between different types of work.
If there is time being spent on something, it should be represented on the board. Hiding work in process, no matter how “special” it is, hurts far more than it ever helps. Your board should always represent reality, not what is deemed as ideal state.
Create A Common Language
Once the basic structure of your Planview AgilePlace board is in place, and cards are flowing through your process, you may want to think through ways to make sure your team uses the board consistently. There are three things to consider to foster an initial common understanding of the “rules of the road.”
Maintain Lane Policies
These guiding principles help clarify the process such as when work qualifies to be pulled from/into a lane.
Prioritize Your Work
Take time to implement rules around what your team classifies as critical, high, normal, and low priority work. These designations are often used to reflect opportunity cost or risk.
Willingly Surface the Bad
Making work visible helps surface problems, too. Signal blocked work and bottlenecks so the whole team is in the loop and can identify patterns. Afterall, it’s hard to improve if you can’t see the problems.
Build Around Constraints
All systems have some bottleneck or constraint that governs output — whether we realize it’s there or not. If you don’t know where that bottleneck is in your process, don’t be worried… Visualizing work is a way to quickly learn. And if you do know what restricts your team’s output, then you’re ahead of the game and can adjust flow to manage. Identifying and managing constraints helps inform form a solid base to achieve speed.
Identify Bottlenecks
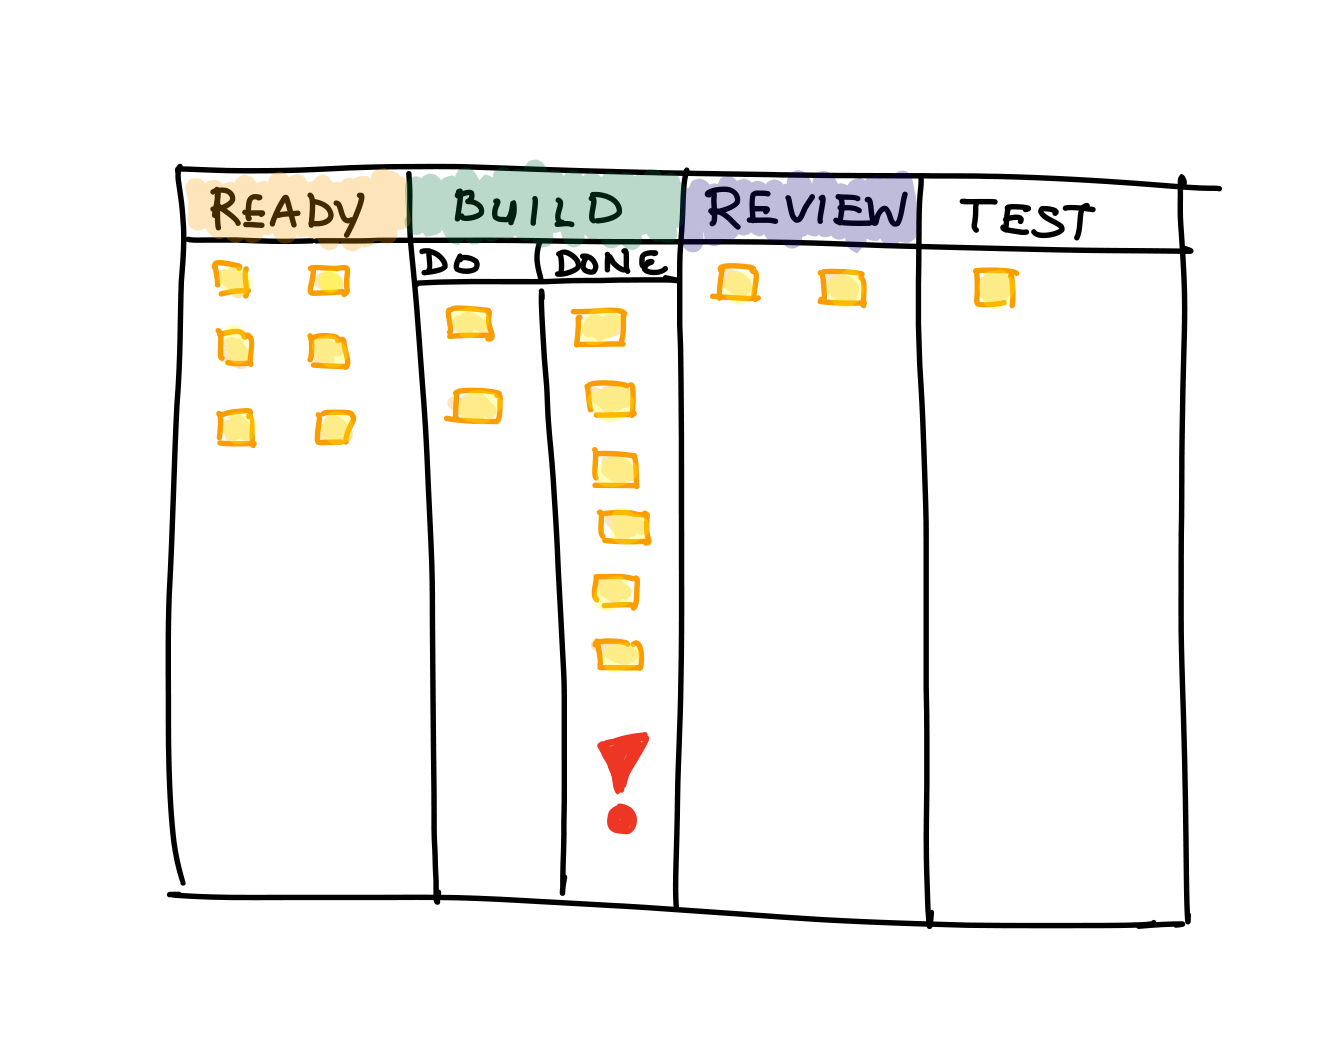
One method for exposing bottlenecks in your system is to add “queue” lanes to your Planview AgilePlace board. Queue lanes represent a step in the flow of work that involves waiting for a handoff to continue/complete the process. For instance, consider a handoff that occurs when there is a proof/prototype of work ready for review by another person. The prototype step is “done”, but the reviewer has not yet begun the review step. If the more work is added to the Prototype – Done lane, but no work is pulled into Review, it’s clear that the team has a bottleneck in the Review step of the process.
Make work time and wait time visible.
Knowing the average time that work spends in each part of the process can aid in understanding where flow can be improved. One way to do this is to calculate the number of items that move through each part of the process every day of the course of a few weeks. If you draw slopes to represent average arrival (start) and average departure (finish) you can evaluate flow based on how the slopes compare to one another. When the slope of the lines between process steps diverge, there is too much work in process, thereby increasing the time spent in a part of the process. You can implement controls to the amount of work flowing into that part of the process to improve flow.

Slopes diverging: Time to adjust WIP limits
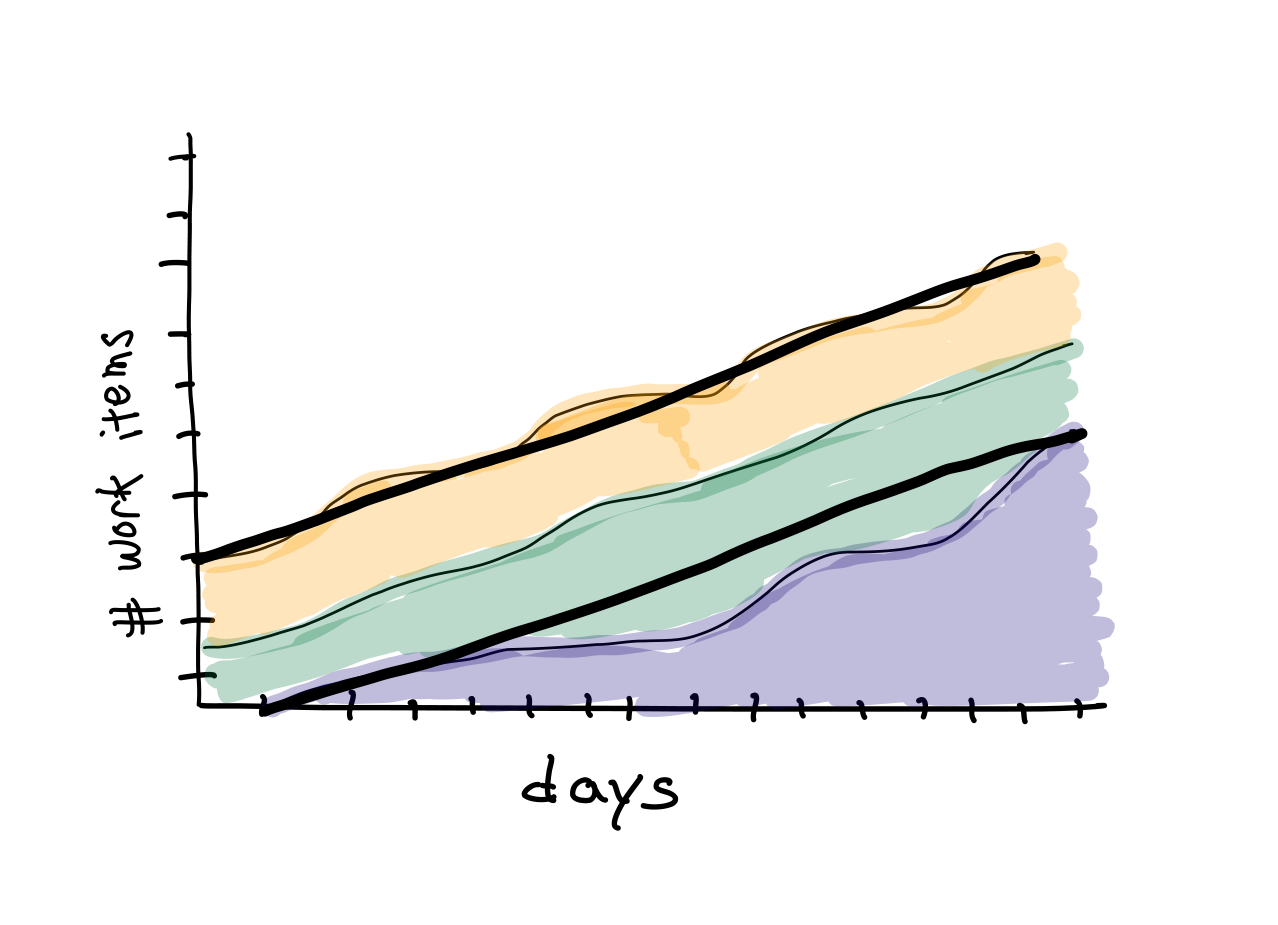
Parallel slopes: Looking good!
Introduce WIP Limits to Encourage Flow
Flow — defined as a steady, continuous stream — cannot occur without controls. The control mechanisms in Kanban are WIP (work in process) limits. WIP limits control how much work can/should be pulled into certain parts of the process to ensure the process as a whole does not become overburdened. When there is too much WIP, work either slows down or stalls completely.
One common starting point is to set the WIP limit to be equal to the number of team members, plus one. If you’re in a team of six, then the initial WIP limit to the create proof/prototype part of the process is seven. Note that this is only a starting point and some adjustments over time should be expected/desired. As teams evolve and skill mixes or area of focus change, these limits will also need to be tweaked to help ensure optimal flow. The key is to start somewhere and measure along the way.
Get Started
The first step toward sustainably fast value delivery is to build a board that accurately reflects your process. From there, use these tips to begin optimizing for speed. Make small, incremental changes so that your work isn’t disrupted by your improvement efforts. Use Planview AgilePlace board metrics to help you determine your baseline, then analyze your improvement over time. Remember – Lean is all about continuous improvement – you don’t have to begin in an ideal state. Start where you are, then use your board as a tool to guide you toward a faster, healthier system.
Learn More
To learn more about the topics discussed in this post, we recommend the following resources:
![A Global Collaborative Work Management Blueprint [Video]](https://blog.planview.com/wp-content/uploads/2019/07/A-Global-Collaborative-Work-management-blueprint.png)